by Max Mar 13,2025
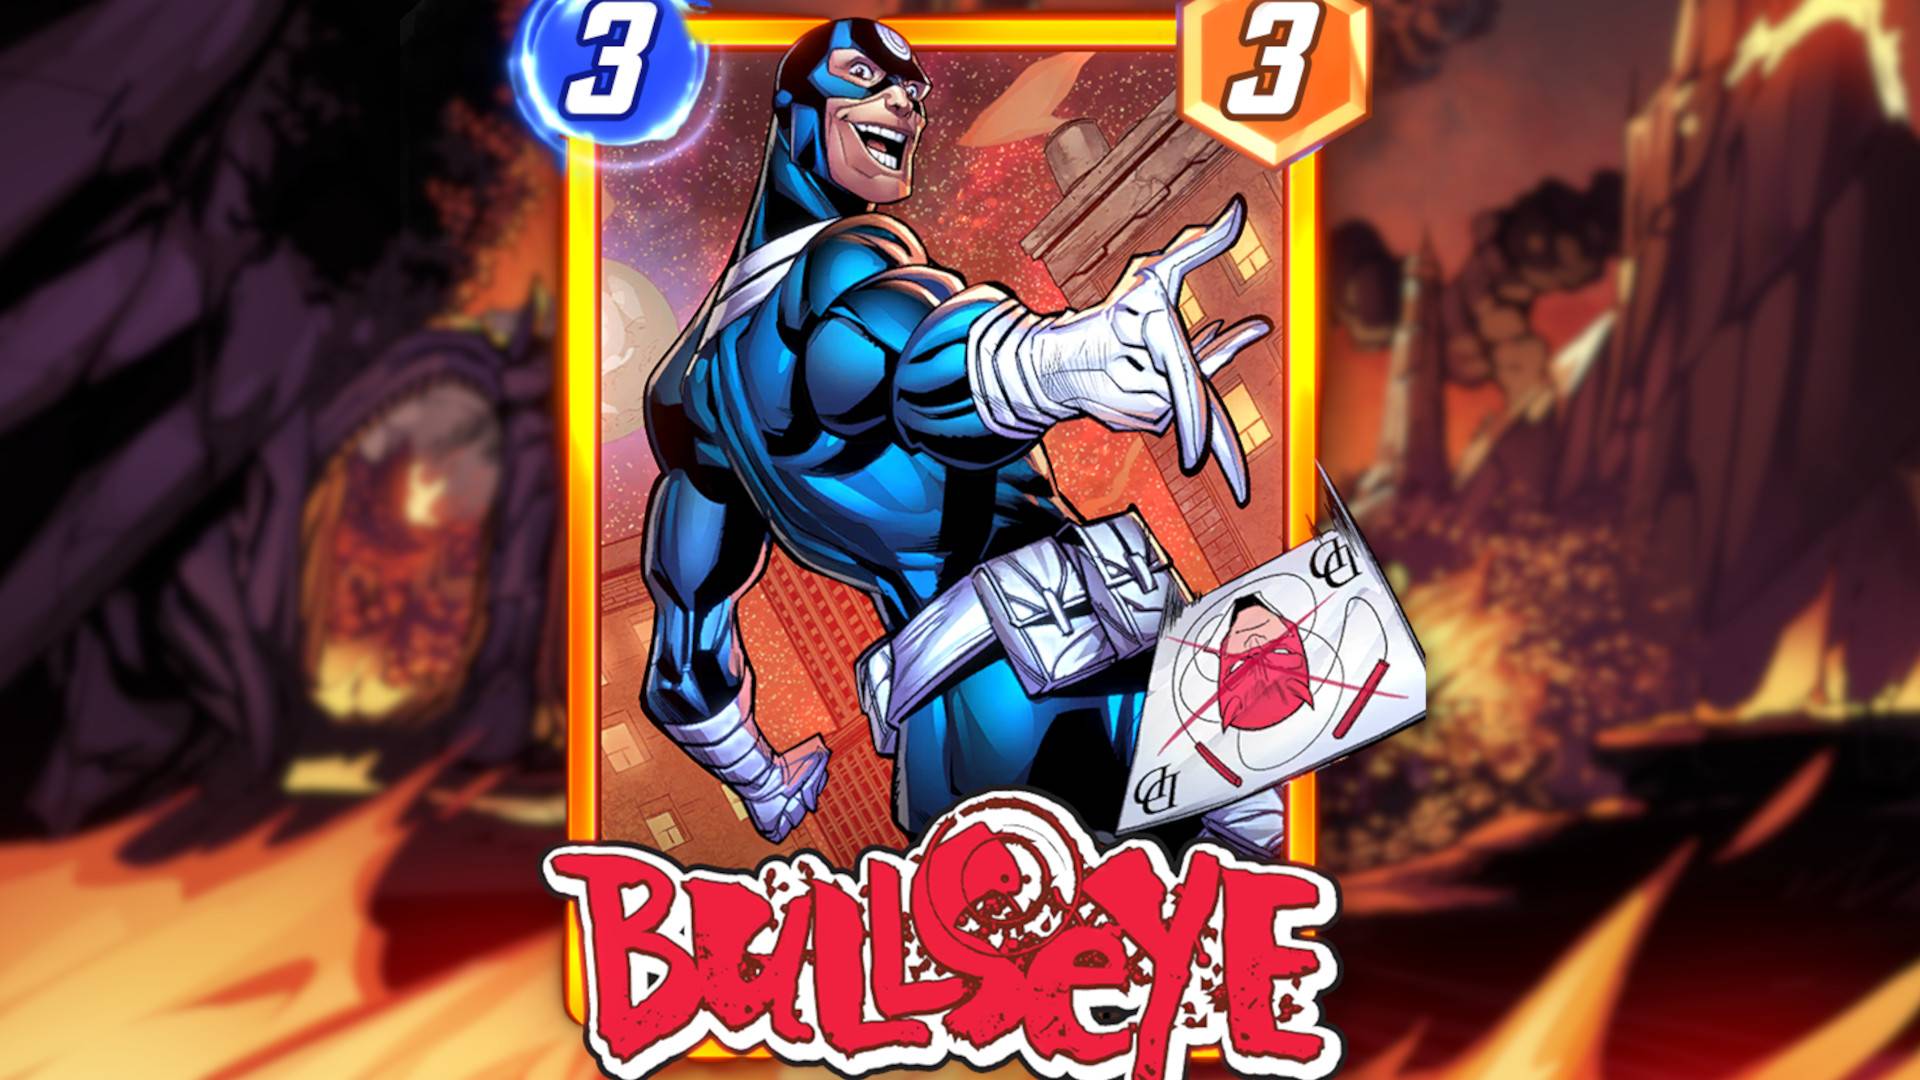
待望の *マーベルスナップ *カードであるBullseyeは、ついにダークアベンジャーズのシーズンに到着し、リリース前にいくつかのテキスト改訂を行っています。このガイドでは、現在利用可能な最高のブルズアイデッキを探ります。
ブルズアイがマーベルスナップでどのように機能するか|マーベルスナップで最高の1日のブルズアイデッキ|ブルズアイはスポットライトキャッシュキーまたはコレクターのトークンの価値がありますか?
Bullseyeは、能力を備えた3コストの3コストカードです。「アクティブ化:手から1以下のすべてのカードを破棄します。 -2パワーを持つ多くの異なる敵カードを苦しめます。」これにより、彼はデッキを破棄するための強力な追加になります。ルーク・ケージのようなカードは彼の効果に直接対抗するので、それに備えてください。
Bullseyeの有効性は、6ターン6の前に彼を演じることにかかっています。彼がアクティブになると、0または1コストのカード(Swarmなどの効果によって割引されるものを含む)を破棄します。彼はX-23やHawkeye(Kate Bishop)などのカードと相乗効果を上げていますが、その組み合わせはまだ広く議論されていません。しかし、アクティベートカードとして、彼は最終ターンでは役に立たない。彼の3コストは彼のプレイウィンドウを制限します。
重要なことに、ブルズアイの能力は異なる敵カードに影響を与えます。彼は同じカードを複数回非難することはありません。 1枚のカードを圧倒することはできませんが、彼は相手のボード全体にブランケット-2パワーデバフを提供し、複数のレーンの混乱に効果的にします。
Bullseyeは、新しいアーキタイプのコアを形成するのではなく、既存の破棄バリエーションに最も適しています。 SwarmとDakenを使用した完全にブルズアイ中心のデッキは、おそらく最適です。代わりに、彼を標準的な破棄デッキに統合することがより効果的であることがわかります。このデッキを考えてみましょう:
軽corn、x-23、ブレード、モルビウス、ホークアイ(ケイトビショップ)、swarm、コリーンウィング、ブルズアイ、ドラキュラ、プロキシュラミッドナイト、モドク、黙示録[このリストをクリックするには、このリストをuntappからコピーしてください。]
このデッキには、シリーズ5カードの軽corn、ホークアイ(ケイトビショップ)、およびプロキシマミッドナイトが含まれています。軽cornとプロキシマミッドナイトは不可欠ですが、ホークアイ(ケイトビショップ)はGambitのようなカードに置き換えることができます。
これは、ブルズアイによって強化された標準的な破棄デッキです。 Bullseyeをボードに載せて、ターン5でModokをプレイし、Bullseyeをアクティブにしてから、軽corn、X-23、Blade、Hawkeye(Kate Bishop)の矢、および割引群からデバフを解き放つことができます。再生された群れと追加のカードにより、ドラキュラは黙示録を取得し、勝利を確保する可能性があります。
HellicarrierとVictoriaの手のバリエーションが存在しますが、上記の「クラシック」廃棄デッキは優れた一貫性を提供します。
あるいは、Bullseyeは、NERFSの後であっても、その有効性がまだ見られないものの、Hazmat/Ajaxデッキに組み込むことができます。これが例です:
シルバーセーブル、ネブラ、ハイドラボブ、ハズマト、ホークアイ(ケイトビショップ)、米国エージェント、ルークケージ、ブルズアイ、ロケットアライグマ、グルート、アンチベノム、マンシング、ajax [このリストをクリックするには、このリストをクリックしてください。]
これは、シルバーセーブル、ハイドラボブ、ホークアイ(ケイトビショップ)、米国のエージェント、ロケットアライグマとグルート、アンチベノム、アジャックスなど、より高価なデッキで、いくつかのシリーズ5カードを備えています。 Hydra Bobは、Rocket Raccoonのような別の1コストのカードに置き換えることができますが、他のものは一般的に不可欠であると考えられています。
このデッキは、米国のエージェントまたはマンシングとアジャックスとの車線を確保しながら、危険物を利用することを目的としています。ブルズアイはいくつかのカードと相乗効果を発揮し、シルバーセーブル、ネブラ、ハイドラボブ、ホークアイ(ケイトビショップ)の矢、および0コストのアンチベノムとの二次危険効果として機能します。これはAjaxを後押しし、しばしば車線の勝利を確保します。これが赤いガーディアンベースのデッキを上回るかどうかは、まだ決定されていない。
廃棄または苦しみのデッキを嫌うプレイヤーにとって、ブルズアイは投資する価値がない可能性があります。これらの原型の外での彼の限られた相乗効果は、特にMoonstoneや今後の牡羊座などのカード(Surturと相乗効果)と比較した場合、彼を魅力的ではない選択肢にします。
マーベルスナップは今すぐプレイできます。
ドールズフロントライン 2: Exilium Global Website がソーシャル機能とともにライブ配信されます!
マーベルライバル:バスを理解し、それをキャッチします
Assassin's Creed Shadowsの新しいゲームプラス:確認されましたか?
アサシンの信条の影でYasukeに優先順位を付けるための最高のスキル
Assassin's Creed Shadowsの動きは、2人のパルクールアスリートによってレビューされました
Death Stranding 2リリース日は、大規模なトレーラーで発表されました
ポケモンゴーリークは新しいアドベンチャー効果をからかいます
Amazon Music Unlimited:無料の3か月間のトライアルが利用可能です
果てないランクアップ:ピクセルサガ-進捗を加速するための最高のコツとテクニック
Apr 22,2026
フォレタレス:カードゲームが終末の運命を形作る
Apr 20,2026
Once Human is a fast-paced, sci-fi survival RPG blending immersive PvE exploration with intense PvP combat. Whether you're diving into the alien ruins, surviving the toxic wasteland, or clashing with rival players, choosing the right build is key to success. Below are optimized PvE and PvP builds for Once Human, based on current meta (as of 2024–2025), character roles, and balance. 🎯 Core Gameplay Overview Classes: Scout, Engineer, Medic, Soldier, Tech (each with unique roles) Playstyles: Stealth, tanking, damage, support, hybrid Progression: Unlock abilities, customize loadouts, upgrade weapons and armor Key Mechanics: Cooldowns, energy management, crowd control, environmental interaction 🔥 Best PvE Builds (Solo & Group Raids) Perfect for surviving alien threats, exploring ruins, and completing story missions. 1. The Relentless Medic (Support/Healer) – PvE MVP Class: Medic Role: Healing, buffing, utility Why it works: Keeps your team alive through high-damage bosses and endless enemies. 🔧 Build Specs: Primary Weapon: Syringe Launcher (heals on hit, inflicts status) Secondary: Bio-Hack Grenade (stuns, slows, heals allies) Passives: Regen Pulse – Heals allies in radius every 5s Adrenaline Surge – 30% speed boost + 10% healing Field Med Kit – Instant revive (1 use per mission) 🧩 Loadout: Healing Beacon (deployable, auto-heals team) Health Regen Armor (increases healing received) Emergency Bandage (30% heal on kill) ✅ PvE Tips: Stay in cover behind tanks. Use Bio-Hack Grenade to control hordes. Prioritize reviving fallen allies in boss fights. 🏆 Best For: Raids, high-level dungeon runs, team-based missions. 2. The Iron Wall (Tank/Melee) – Frontline Protector Class: Soldier Role: Tank, crowd control, decoy Why it works: Absorbs damage, holds aggro, protects squishy teammates. 🔧 Build Specs: Primary: Plasma Repeater (high burst, close-range) Secondary: Shock Baton (stuns, 100% uptime CC) Passives: Shield Bash – Stun on block Vitality Armor – 40% reduced damage when below 30% HP War Cry – Decreases enemy damage by 15% in range 🧩 Loadout: Heavy Combat Shield (blocks 80% of incoming damage) Sonic Pulse Grenade (knocks back enemies) Reinforced Armor Set (reduces fall damage) ✅ PvE Tips: Use Shield Bash to interrupt enemy abilities. Position yourself between the boss and your team. Use War Cry to make bosses focus on you. 🏆 Best For: Boss fights, front-line push, solo challenging dungeons. 3. The Phantom Scourge (Stealth DPS) – Solo Explorer Class: Scout Role: Assassin, scout, burst damage Why it works: Silent kills, high mobility, ideal for solo play. 🔧 Build Specs: Primary: Shadow Stalker Rifle (silent headshot, 1-shot kill at range) Secondary: Cloak Device (20s invisibility, 3 uses per mission) Passives: Shadow Step – Teleport 10m with 1.5s invisibility Phantom Sneak – +50% movement speed in shadows Silent Assassin – 300% damage bonus to backstab 🧩 Loadout: Acid Dart Grenade (poison + bleed over time) Stealth Cloak Armor (reduces enemy detection chance) Night Vision Goggles (see through fog) ✅ PvE Tips: Use Shadow Step to flank enemies. Kill sentries silently before alerting others. Focus on high-value targets (scouts, medics). 🏆 Best For: Solo exploration, hidden objectives, night missions. 🌪️ Best PvP Builds (Player vs Player) Designed for chaos, map control, and quick eliminations. 1. The Devastator (Melee Assassin) – PvP King Class: Scout (specialized) Role: High-risk, high-reward assassin Why it works: Fast, silent, and lethal at close range. 🔧 Build Specs: Primary: Flesh Ripper Knife (1.5s to kill, 30% bleed) Secondary: Grapple Hook (teleport to enemy, 20m range) Passives: Killer Instinct – 50% faster reload when under 30% HP Silent Death – 100% critical chance on backstab Blade Storm – 3 rapid slashes (20% chance to spawn a clone) 🧩 Loadout: Eclipse Cloak (invisible for 1.5s when not moving) Berserker Gauntlets (increased melee damage, bleed) Magnetic Pull Grenade (pulls enemies into your kill zone) ✅ PvP Tips: Use Grapple Hook to surprise enemies mid-strafe. Circle back for backstabs in open areas. Avoid open fights — ambush from cover. 🏆 Best For: Control maps, capture points, assassinate high-value targets. 2. The Stormbringer (Area Control DPS) – PvP Dominator Class: Engineer Role: Zone control, AoE damage, trap master Why it works: Controls space, disables groups, dominates objective zones. 🔧 Build Specs: Primary: Tesla Coil Rifle (electrifies area, shocks multiple enemies) Secondary: Remote Mine (triggered by footstep, 300 damage) Passives: Overload Field – 10m explosion every 10s (AoE damage + stun) EMP Pulse – Disables enemy gadgets for 5s Trap Master – 2x trap capacity, 30% faster trap setup 🧩 Loadout: Laser Tripwire (triggers mines remotely) Anti-Gravity Field (slows and pulls enemies) Rapid-Fire Grenade Launcher ✅ PvP Tips: Set up mines in choke points and spawn areas. Use Overload Field to clear enemy pushes. Combine EMP Pulse with traps to disable healers. 🏆 Best For: Control maps, objective defense, team fights. 3. The Iron Bastion (PvP Support/Tank) – Unkillable Wall Class: Soldier (tank build) Role: Flag carrier, point defense, tank Why it works: Survives long fights, protects team, absorbs damage. 🔧 Build Specs: Primary: Heavy Plasma Cannon (high-damage, slow fire rate) Secondary: Stun Grenade (1.5s knockback + 1.5s stun) Passives: Last Stand – 50% damage reduction when under 20% HP Shield Wall – 30% chance to reflect 25% damage on block Battle Cry – Increases team damage by 15% in 10m radius 🧩 Loadout: Kinetic Armor Plate (blocks 70% of melee damage) Cryo Trap (freezes enemies for 2s) Shield Generator (self-revive, 20s cooldown) ✅ PvP Tips: Carry the flag while tanking enemy pushes. Use Shield Wall to reflect enemy abilities. Position near objectives to deter attackers. 🏆 Best For: Flag capture, point defense, team duels. 🎮 General Tips for Both PvE & PvP Tip Reason Always carry 1–2 healing items Critical in both modes, especially in PvP. Use environment Hide behind pillars, use walls to block shots, lure enemies into traps. Master your class’ unique ability It’s often game-breaking (e.g., Grapple Hook, Bio-Hack Grenade). Rotate builds Try different loadouts to adapt to new maps and meta changes. Play to your strengths Don’t be a Scout in a tank fight. Use roles strategically. 📌 Final Verdict: Top 3 Builds Mode Best Build Why PvE (Solo) Phantom Scourge (Scout) Silent, fast, deadly – ideal for solo content. PvE (Group) Relentless Medic (Medic) Keeps team alive; essential for raids. PvP (Match) Stormbringer (Engineer) Controls zones, dominates map objectives. 🔥 Pro Tip: Combine Medic + Engineer in your group for perfect synergy: Medic heals Engineer sets traps and disables enemy abilities Scout flanks Soldier tanks Team composition wins wars. Stay sharp, keep your gear upgraded, and remember: In Once Human, survival isn’t just about strength — it’s about smart choices. Ready to dive in? The ruins are calling. 🌑💥
Apr 17,2026
ギャラクシー防衛要塞TD:戦略で制覇する
Apr 16,2026
バンダイナムコが別の物語ゲームをリマスター、おそらくシリアと推測
Apr 14,2026
 カテゴリー
カテゴリー