by Owen Jun 18,2025
Minecraft is a globally acclaimed game known for its limitless creativity and cross-platform compatibility. It’s no wonder that many Chromebook users are eager to play it on their lightweight, Chrome OS-powered devices. While Chromebooks are not traditionally associated with high-end gaming, they can indeed run Minecraft with the right setup. The key lies in understanding how Chrome OS works and what steps you need to take to get the game up and running smoothly.
This guide will walk you through everything you need to know about installing and optimizing Minecraft on your Chromebook. Whether you're using the Bedrock Edition from the Google Play Store or diving into Linux-based installation methods, we've got you covered. Let’s dive in.
To ensure smooth gameplay, your Chromebook should meet the following minimum system requirements:
Meeting these specs should allow for stable performance while playing Minecraft. If you encounter lag or stuttering despite meeting the requirements, don't worry—we’ve included optimization tips later in this article to help boost performance on lower-end systems.
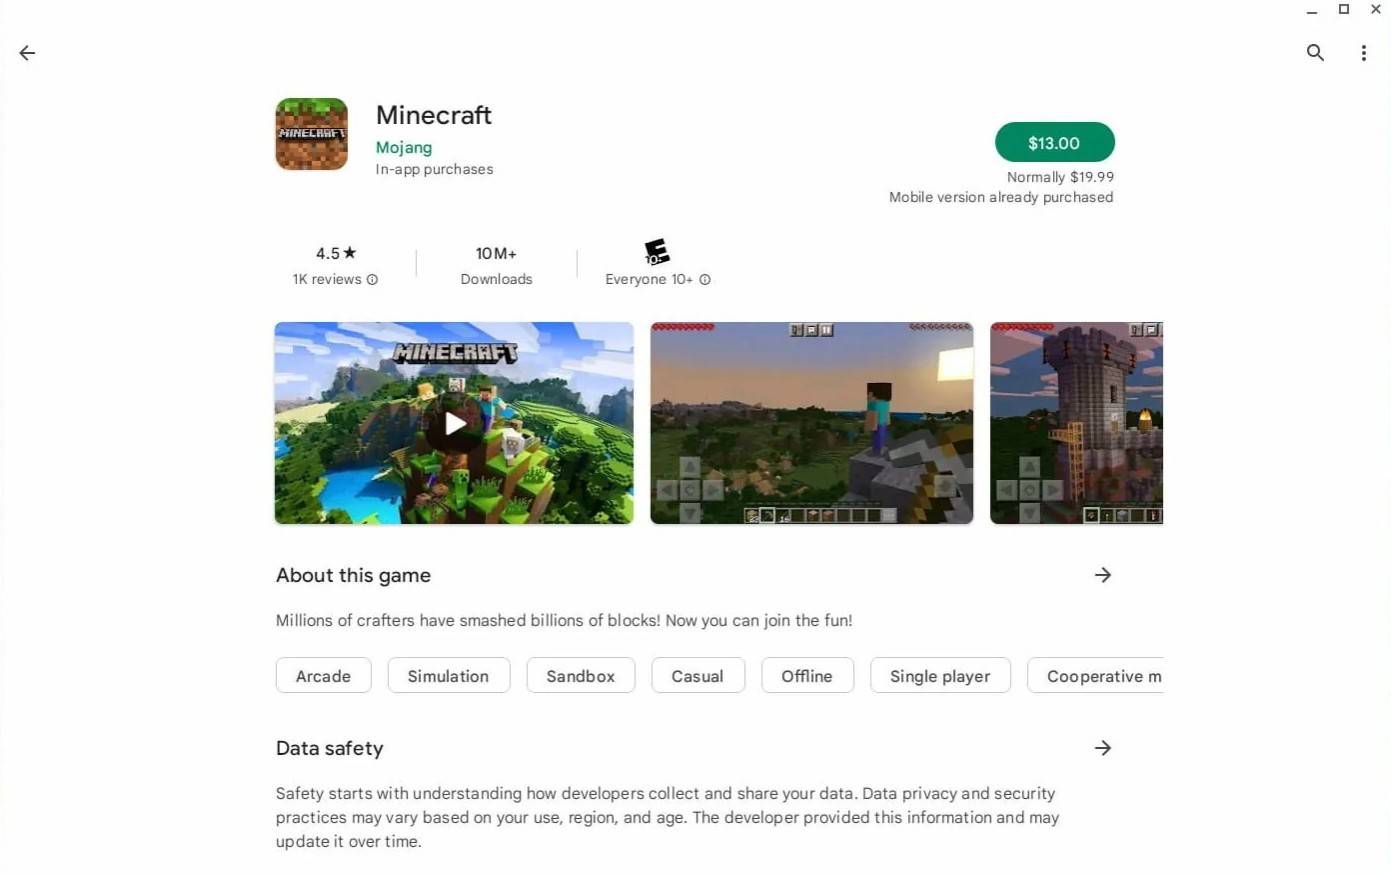
The simplest way to install Minecraft on a Chromebook is via the Google Play Store, where you can download the Bedrock Edition directly. Just open the store, search for *Minecraft*, and proceed to purchase and install it. Keep in mind that the full version costs $20. However, if you already own the Android version ($7), you'll only need to pay an additional $13 to upgrade to the full edition.
This method is ideal for users who prefer a quick and hassle-free installation without needing to interact with Terminal or modify system settings. However, some players may prefer a more traditional experience, which brings us to the alternative Linux-based installation method.
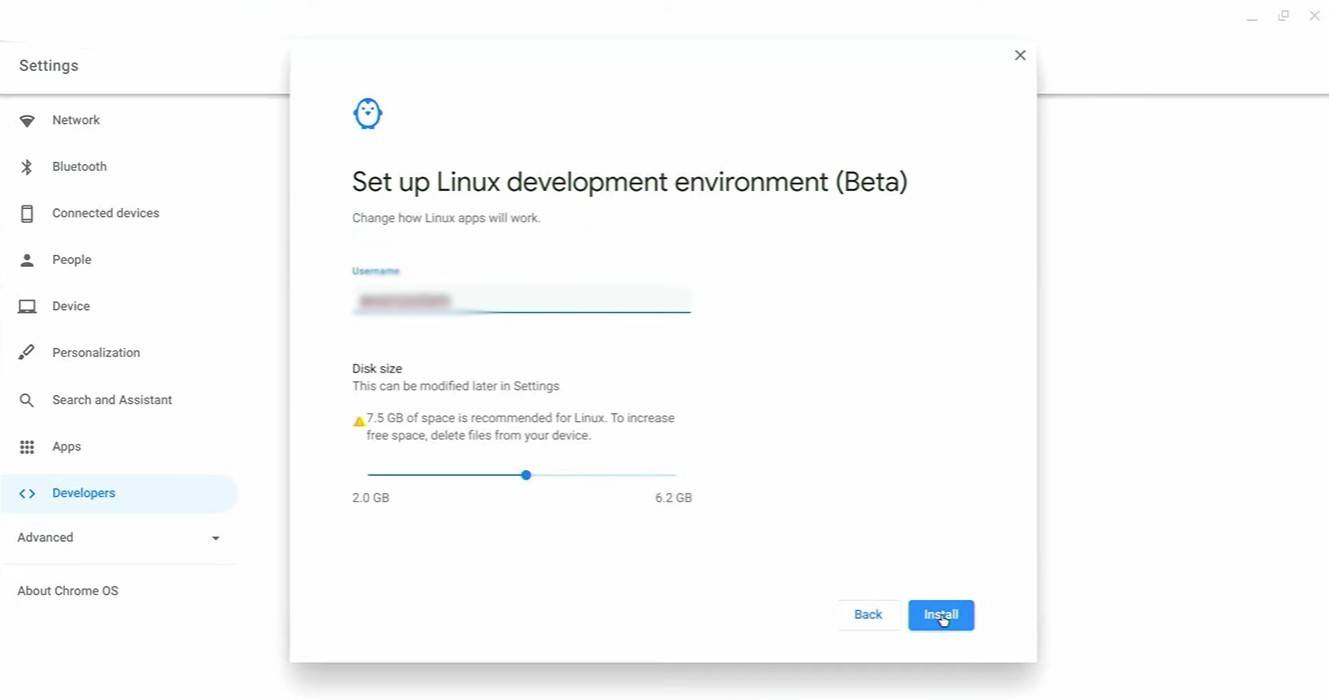
Before you can install Minecraft using Linux tools, you’ll need to enable Developer Mode on your Chromebook. This allows access to advanced features like the Linux terminal environment, which is essential for custom installations.
To begin, open the Chrome OS Settings menu—accessible from the Shelf (similar to the Start menu in Windows)—and navigate to the "Developers" section. There, toggle on the “Linux development environment” option. Follow the prompts to complete the installation process. Once finished, the Terminal app will automatically open, signaling that you’re now ready to proceed with the next step.
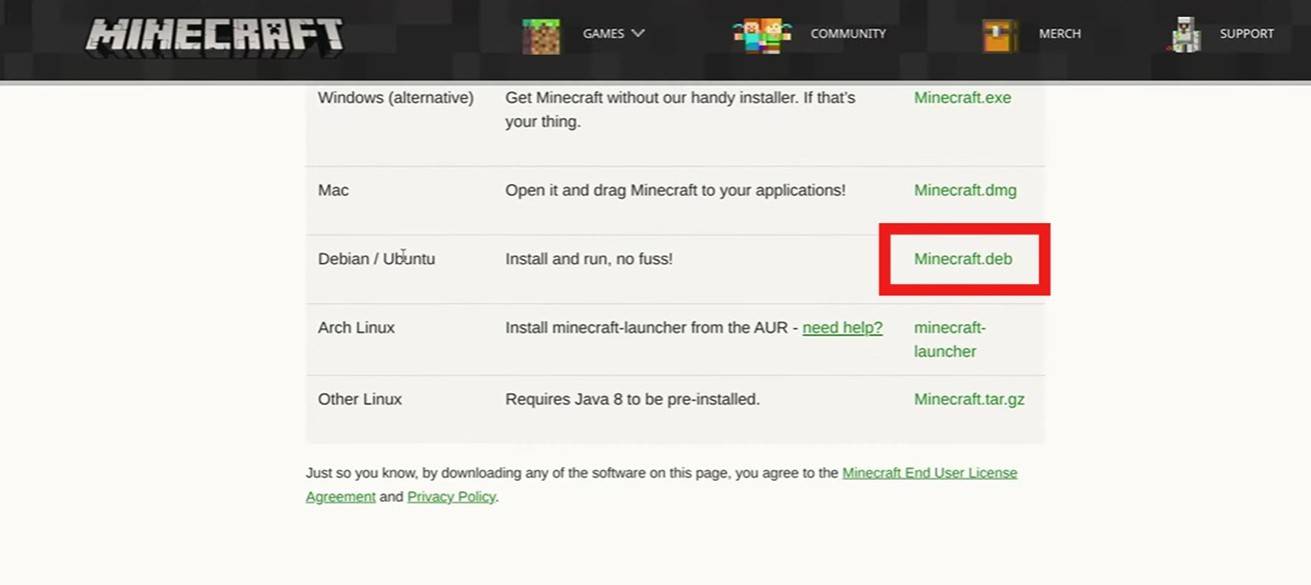
With the Linux environment active, you can now install Minecraft using a Debian package or by manually setting up Java and launching the game via a .jar file. This method offers more flexibility and control, especially for experienced users comfortable with command-line operations.
We've prepared a step-by-step walkthrough to make this process as straightforward as possible. By the end of this guide, you’ll be able to enjoy Minecraft on your Chromebook in under 30 minutes—even if you're new to Linux environments.
Girls Frontline 2: Exilium Global Website Goes Live, Along With Its Socials!
Marvel Rivals: Understanding Bussing and Catching It
New Game Plus in Assassin's Creed Shadows: Confirmed?
Top Skills to Prioritize for Yasuke in Assassin’s Creed Shadows
Assassin’s Creed Shadows Movements Reviewed by Two Parkour Athletes
Death Stranding 2 Release Date Unveiled in Massive Trailer
Pokemon GO Leak Teases New Adventure Effects
Amazon Music Unlimited: Free 3-Month Trial Available

Little Robot Mod
Download
Charades and other party games - Lexis Pexis
Download
Brain Boom - Tricky Puzzles game, IQ Challenge
Download
Rezident slot safes
Download
Poker Mania
Download
EA Sports FC Mobile 25 (FIFA Fútbol)
Download
MainCraft: build & mine blocks
Download
Red Cherry Slot Machine
Download
Hex Kingdom
Download
Netflix will soon offer interactive party games you and your friends can play via mobile
Apr 27,2026
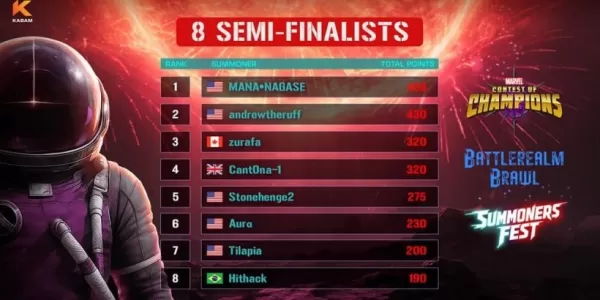
Marvel Contest Semi-Finalists Revealed for Battlerealm Brawl
Apr 25,2026
Endless Grades: Pixel Saga – The Best Tips & Tricks To Boost Your Progression
Apr 22,2026
Foretales: Card Game Shapes Apocalyptic Fate
Apr 20,2026
Once Human: Best Builds for PvE and PvP
Apr 17,2026
 Category